Blob storage
Version: 2022-11-14
Updated: 2024-08-12

This service is available to Accountables and Privileged members of a workspace.

Blob storage in myDRE is restricted to the context of one workspace
What is Azure Blob storage?
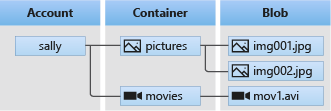
Azure Blob storage is optimized for storing massive amounts of unstructured data. Unstructured data is data that does not adhere to a particular data model or definition, such as text or binary data. Blob storage offers three types of resources:
- The storage account
- A container in the storage account
- A blob in the container
The following diagram shows the relationship between these resources.
Within the myDRE, every workspace already has its own storage account. A blob container should be created in this storage account to make it accessible from and only from that workspace.
The difference with your workspace fileshare
Blob storage behaves differently from regular data storage, such as the workspace fileshare (the 'Z:' or 'data' drive). The most important difference is that there is no real folder structure in blob storage. This also means that you cannot use your regular file explorer to view the files within your blob container. It is possible, however, to create a virtual file structure that can be visualized using Azure Storage Explorer. For more information, see Using Azure Storage Explorer within a virtual machine below.
Types of blob storage
There are three types of blob storage: Block blob, Append blob and Page blob. Block blob is the default type, and is the logical choice for most purposes in the DRE. For more information about types, see the Azure webpage about blobs.
Why use blob storage?
Blob storage is an ideal solution for storing large amounts of data, for example when the default fileshare (Z:-drive) is not sufficient (i.e., you have > 5 TB of data). It is also cheaper to store data in a blob container compared to storing it on the fileshare, although blob storage comes with access costs, i.e., there is an additional charge on operations on the data (read, write).
Microsoft Azure makes a distinction between Hot and Cool access tiers for blob storage. The Hot tier is optimized for data that needs to be accessed or modified frequently, whereas the Cool tier is optimized for data that is infrequently accessed or modified. Storage costs are cheaper for Cool blob storage, while access costs are more favorable for Hot blob storage. A third access tier is called Archive, which is used for data that is rarely accessed - gaining access to data in this tier can take up to 15 hours.
The access tier can be set per blob when uploading or listing data from a virtual machine. If the tier is not explicitly specified, for example when uploading directly through the DRE Portal, the default tier is chosen (Hot).
Costs of blob storage
The cost overview below was last updated on August 12th, 2024. Current costs can be found on the Microsoft Azure website. Prices do not include VAT or any organisational discounts.
Prices in € | Fileshare | Hot blob | Cool blob | Archive blob |
| Storage per used GiB per month | 0.18029 | 0.0185 | 0.00925 | 0.00167 |
Write operations (per 10,000)1 | 0.0274 | 0.0648 | 0.1202 | 0.1443 |
| Read operations (per 10,000)2 | 0.0022 | 0.0056 | 0.0121 | 7.2116 |
| Iterative Read Operations (per 10,000)3 | 0.0274 | 0.0052 | 0.0052 | 0.0052 |
| Iterative Write Operations (100’s)4 | N/A | 0.0650 | 0.0650 | 0.0650 |
| Data Retrieval (per GB) | Free | Free | 0.0093 | 0.0222 |
| Data Write (per GB) | Free | Free | Free | Free |
| Index (GB/month) | N/A | 0.0259 | N/A | N/A |
| All other Operations (per 10,000), except Delete, which is free | 0.0022 | 0.0056 | 0.0056 | 0.0047 |
1 The following API calls are considered write operations: AppendFile, CreateFilesystem, CreatePath, CreatePathFile, FlushFile, SetFileProperties, SetFilesystemProperties, RenameFile, RenamePathFile, CopyFile
2 The following API calls are considered read operations: ReadFile, ListFilesystemFile
3 The following API calls are considered iterative read operations: List Filesystem & List Path
4 The following API calls are considered iterative write operations: RenameDirectory, RenamePath, RenamePathDir
Creating a blob container
There are multiple ways to create a blob container. The easiest way to do this is via the Azure Portal.
 Important: The Azure Portal is the back-end of the myDRE. Many features have been made unavailable for regular users, to ensure the integrity and safety of your resources, but it still offers a lot of possibilities to view or modify the elements that make up your workspace. Always only follow the exact steps as described in the articles on support.mydre.org and do not stray from the path. AnDREa B.V. cannot be held accountable for any damage caused by inappropriate use of the Azure Portal.
- Go to https://portal.azure.com and log in with your @mydre.org credentials.
- In the top left, click on
and then on
.
- Click on the unique name of your workspace.
- Next, find your workspace's storage account in the list of resources (dwsxxxacronymdata) and click on it.
- On the left hand side under Data storage, click on Containers (see below).
- Add a blob container by clicking on
at the top of the page.
- Fill in a name for your blob container1.
- Set Public access level to Private (no anonymous access).
- Click Create to make your new blob storage (this may take a few minutes).
1The name of a blob container may only contain lowercase letters, numbers, and hyphens, and must begin with a letter or a number. Each hyphen must be preceded and followed by a non-hyphen character. The name must also be between 3 and 63 characters long.
Your blob storage container has now been created and is also visible in the myDRE portal under the Files tab of your workspace (see screenshot below; you may need to refresh your browser).
Putting data into your blob container
You can upload data to your blob container:
- Step 1: In the myDRE Portal
- via the inbox or
- transfer from the fileshare
- Step 2: From a virtual machine
- using Azure Storage Explorer <- Recommended
- using code (e.g., Python, R, Powershell)
Via the inbox
As with the fileshare, files require the upload manager of the myDRE, which places the files in a dedicated Inbox folder with a timestamp. Click on the Upload files button in Files section and upload the files to your data storage. For more information about the upload manager, see Uploading your data.
Once your files have been uploaded, proceed with the description below using Azure Storage Explorer from within a virtual machine.
Transfer from the fileshare
Important: This method is only suitable for single, relatively small files that need to be transferred quickly. The safest method to move files from the data or inbox fileshare is by using Azure Storage Explorer from within a virtual machine (see below). Do not use this method to move files from your blob container to a fileshare, or to transfer folder structures between a blob container and the fileshare, as it can lead to corruption of your data.To transfer a file from the fileshare to your blob container via the myDRE Portal, select the file and click on Copy button. Next, go to your blob container via the home button, and click on the Paste icon. This may take a few minutes, depending on the size of the file.
Using Azure Storage Explorer within a virtual machine
The safest and easiest way to move data to your blob container is by using Azure Storage Explorer from within a virtual machine.
Preparation
- As the blob container cannot be approached directly from outside your workspace, data must first be placed or created within the workspace (on the Z:-disk, Inbox, or a VM's C:-disk).
- Make sure the proxy settings within the virtual machine are set correctly:
- Windows key and type proxy settings
- Scroll down, and add: ;blob.core.windows.net
- Check: Don't use the proxy server for local (intranet) addresses
- Press Save
- Make sure you have Azure Storage Explorer installed on a virtual machine
- If available install from Shared Software Install from
- Radboudumc users can find it in the Application Installer on their VM).
- Alternatively, download Azure Storage Explorer from here and upload it to your Workspace
- Generate a temporary SAS URL for your blob container and upload it to your workspace in a .txt file:
- Go to https://portal.azure.com and find your blob container (see Creating a blob container above).
- On the left hand side under Settings, go to Shared access token.
- In the drop-down menu under Permissions, check the permissions you need for your interactions with the blob container (Read, Add, Create, Write, Delete, List).
- If necessary, adjust the expiry date/time.
- Click Generate SAS token and URL.
- Copy the Blob SAS URL and paste it into Notepad (or another text editor), then save it to a safe location on your computer and upload it to your workspace (you may want to immediately delete it permanently from your computer after uploading).
Connecting to your blob container
- Connect to a virtual machine and run Azure Storage Explorer.
- Click on
to start a connection, choose Blob container, then select Shared access signature URL (SAS) and click Next.
- Find the uploaded .txt file with the SAS URL on the Z:-drive and copy the URL to the box asking for a Blob container SAS URL (the Display name should automatically show the name of your blob container).
- Click Next, check the connection information, and then click Connect.
You are now connected to your blob container and, depending on the chosen permissions, you can move data between a fileshare (Z:-disk, Inbox) or local disk (C:) and the container, and change blob tiers (Hot, Cool, Archive).
Uploading data to the blob container
Data can be uploaded to the container either by dragging files or folders from your Windows Explorer to Azure Storage Explorer, or by clicking on the Upload button. Using the upload menu allows you to choose the access tier immediately.
Changing the access tier
To change the access tier of a blob or entire folder already present in the container, simply right-click it and choose Change access tier.
If applied to a folder, the access tier for all subfolders and files within it is also changed.
Using code within a virtual machine
Blob storage can also be approached using scripts in a virtual machine. There are several examples and templates available for a multitude of programming languages (e.g., .NET, Java, Python) on the Azure website: https://docs.microsoft.com/en-us/azure/storage/blobs/storage-quickstart-blobs-python.
Examples of code snippets will be added here in the future. If you would like to contribute your own code examples, please send them to support@mydre.org.
Related Articles
Uploading your data
This feature is available to workspace members all except the Data reader A data upload or download does not require a running Virtual Machine! If you're uploading a folder with many subfolders, make a zip file! In your workspace, you can upload a ...Uploading your data
All workspace members (except Data reader) can upload data to the workspace Tips: A data upload or download does not require a running Virtual Machine. If you're uploading a folder with many subfolders, make a zip file. To work in your myDRE ...Storage types in the workspace
Disclaimer: you are yourself responsible for managing your research budget and keeping track of workspace costs! While we try to keep the article update, the listed information is dependent on policies and tariffs that may change over time. No rights ...Proxy configurations for connecting to a server or blob
Version: 2022-11-02 Update: 2022-11-14 Introduction Domain allowlisting is a selfservice feature that is now available on myDRE. As the name implies, domains on the allowlist can be accessed from within the Workspace (you can request specific domain ...Downloading and transferring files via data requests
Introduction Downloading or transferring data from the the myDRE workspace always follows an approval flow. This means that a download (to local machine) or transfer request (to another workspace) needs to be requested by the member, which will then ...